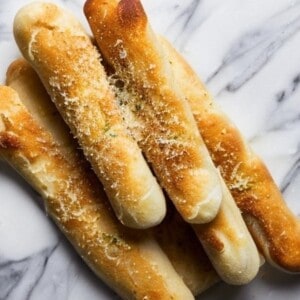
Today I'm making a recipe for gluten free breadsticks! These delicious breadsticks are soft and delicious and can be made easily for any dietary need or preference!

While others enjoy their gluten filled breadsticks, often there aren't any options on the table for gluten free breadsticks. But today I'm sharing one of my favorite adaptable recipes. It can be easily made for any one by just changing the flour! If you love gluten free bread, this gluten free microwave bread is perfect in a pinch, or this garlic bread loaf saves time rolling out dough. For a sweet breakfast treat try some gluten free monkey bread!
Jump to:
Ingredients
The ingredient list is super simple for this recipe. You will need:
- Gluten free flour or all purpose flour
- Water
- Sugar
- Yeast
- Salt
Instructions
- In a large bowl, whisk together warm water (around 105°F), yeast, and sugar. Let the mixture sit for 5 minutes until it gets foamy and bubbly. This activates the yeast and ensures your breadsticks rise well.
- Add the flour and salt to the yeast mixture. Stir with a wooden spoon until a shaggy dough forms.
- Gently knead the dough on a lightly floured surface for a few minutes until it becomes smooth and elastic. Don't overwork it, or your breadsticks might be tough.
- Shape the dough into a ball, place it in a greased bowl, and cover it with a damp cloth. Let it rise in a warm place for 15 minutes.
- Preheat your oven to 350°F (175°C) and line a baking sheet with parchment paper for easier cleanup.
- Divide the dough into 8 equal pieces and roll each piece into an 8-inch long rod. You can use your hands or a rolling pin for this.
- Place the breadsticks on the prepared baking sheet, leaving some space between them for them to expand.
- Bake for 8-12 minutes, or until the breadsticks are golden brown and cooked through. You can insert a toothpick in the center and it should come out clean.
- Brush the warm breadsticks with melted butter or olive oil (optional).
- Sprinkle them with your favorite seasonings like salt, garlic powder, Italian seasoning, or parmesan cheese (optional).
- Serve your delicious gluten-free breadsticks warm and enjoy!
Substitutions
Everyone should be able to enjoy these gluten free breadsticks! Here are a few substitutions you can make if needed:
- Flour: We recommend using gluten free flour for this recipe. Make sure the flour you use has xanthum gum and/or psyllium husk for soft chewy breadsticks. You can use all purpose flour in place of the gluten free flour.
- Yeast: If you are not able to have yeast you can omit the yeast and substitute self rising flour. The rolls may be a little more dense but will still taste great!
Storage
The breadsticks can be stored in an airtight container for several days or frozen for several months, then reheated.
Tips
- For a chewier texture, let the dough rise for longer, up to 20 minutes.
- You can adjust the baking time slightly depending on your oven.
Variations
- Garlic Breadsticks: Brush cooked breadsticks with melted butter or oil after baking. Sprinkle evenly with garlic powder and Italian seasoning. Serve.
- Cinnamon Sugar Breadsticks: After removing breadsticks from the oven, melt ¼ cup of butter (non dairy butter or dairy butter). In another bowl stir together ¼ cup sugar and ½ tablespoon of cinnamon. Brush breadsticks with butter, then top generously with cinnamon sugar mixture.
- Garlic Parmesan Breadsticks: Melt ¼ cup butter (non dairy or dairy). Stir together ½ cup finely grated parmesan and 1-2 teaspoon garlic powder in a separate bowl. Bursh cooked breadsticks with butter (dairy or non dairy). Roll or generously sprinkle with the parmesan and garlic powder mixture.
FAQ
Yes, you can substitute regular all-purpose flour if you don't need to follow a gluten-free diet. However, the measurements may vary slightly, so you may need to adjust the amount of flour or yogurt to achieve the right consistency.
Yes, these breadsticks freeze well! Once cooled, you can store them in an airtight container or freezer bag and freeze for up to 2-3 months. To reheat, simply thaw at room temperature or warm them in the oven before serving.
Absolutely! Feel free to customize the breadsticks with your favorite toppings and seasonings. Try adding shredded cheese, chopped herbs, minced garlic, or even a sprinkle of sea salt for extra flavor.

5 Ingredient Gluten Free Breadsticks
Equipment
- baking sheet
Ingredients
- ¾ cup warm water
- ½ tablespoon active dry yeast
- ½ tablespoon sugar
- 1 ½ cups gluten free flour
- ½ teaspoon salt
Instructions
- Combine warm water, active dry yeast, and sugar in a mixing bowl, whisking until the yeast dissolves. Let the mixture rest for five minutes until it begins to bubble and activate.
- Add all-purpose flour and salt to the bowl, stirring with a wooden spoon until a cohesive dough forms.
- Gently knead the dough on a lightly floured surface until it becomes smooth and pliable.
- Shape the dough into a ball and cover it, allowing it to rest for 15 minutes to relax the gluten.
- Divide the dough into 8 equal portions and roll each portion into an 8-inch rod on a floured surface.
- Place the shaped breadsticks onto a lightly greased baking sheet, spacing them evenly apart.
- Bake the breadsticks in a preheated oven at 350 degrees Fahrenheit for 8 to 12 minutes or until they develop a golden brown crust.


Leave a Reply