As pet owners, we always want the best for our furry friends, including their treats. Himalayan Yak Chews have gained popularity as a long-lasting and nutritious option for dogs. However, for dogs with lactose intolerance, traditional Yak Chews may not be suitable due to their lactose content.

Our puppy Bailey came with a nice little allergy to dairy. But she is a chewer and has gone through many many dog bones since coming to our home.
It's no lie that we love our dogs, and they have been a HUGE part of our BurntApple family for many years. From a Halloween dog treat display to a dog DNA party, our pets take center stage a lot at our house! We've even made dog cinnamon rolls, dog friendly hot cocoa, and even gourmet dog treats for a Charlie the Ranch Dog Birthday party!
Jump to:
What are Himalayan Yak Chews?
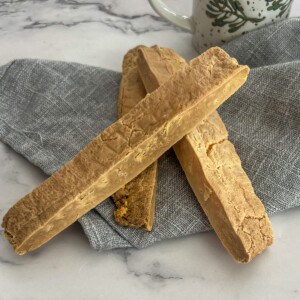
Himalayan Yak Chews, also known as Himalayan Dog Chews or Yak Milk Chews, are natural dog treats made from a traditional recipe originating in the Himalayan region of Nepal. These chews are crafted from a blend of yak milk, cow milk, and a small amount of lime juice or vinegar and salt for flavoring. The mixture is then heated, strained, and shaped into various sizes and shapes before being sdried to create a hard and durable chew.
Ingredients
You only need 3 ingredients to make these chews! You will need:

- lactose free milk
- vinegar or lime juice
- salt
Instructions
There are a few steps you will need to take to make this recipe so make sure to read carefully!

Bring milk to a boil, remove from heat and stir in vinegar and salt for additional 1-2 minutes until curds form.

Pour mixture into strainer lined with cheesecloth. Press with a spoon or spatula to remove moisture.

Take curd and form into a rectangle, wrap and press between two heavy objects for 4-6 hours to remove excess moisture.

Place into oven at 200 degrees and cook for 4-6 hours until desired hardness is reached or in the dehydrator for 12-24 hours at 150 degrees until desired hardness of the bone is reached.
- Prepare the Yak Milk Mixture:
- In a large pot, heat the yak milk over medium heat until it reaches a gentle boil. Stir constantly to prevent scorching.
- Once the milk is boiling, remove from heat and add a small amount of lime juice or vinegar and salt to flavor the mixture.
- Stir constantly for 1-2 minutes until curds form.
- Strain the Mixture:
- Once the yak milk mixture has thickened, remove it from the heat and allow it to cool slightly.
- Line a fine mesh strainer or cheesecloth over a large bowl or pot.
- Carefully pour the thickened milk mixture through the strainer, allowing the whey to drain off. Use a spoon or spatula to gently press out any excess liquid.
- Shape the Chews:
- Fold the dough into a rectangle in the cheesecloth and place between two hard objects. You can see a full version of what this looks like in this video. Leave for 4 hours.
- Bake the Chews:
- Place the baking sheet in the preheated oven and bake the chews at a low temperature (200 degrees) for several hours, or until they are fully dried and hardened. This process may take 4-6 hours or longer, depending on the size and thickness of the chews.
- Check the chews periodically and rotate the baking sheet if necessary to ensure even drying.
- You can also set your dehydrator to 150 degrees and dehydrate for 12-24 hours or until desired doneness is reached.
How to Cool, Store and Serve to Your Dog
- Cool and Store:
- Once the chews are completely dried and hardened, remove them from the oven and allow them to cool to room temperature.f
- Store the homemade yak chews in an airtight container or zip-top bag at room temperature. They can also be stored in the refrigerator for extended freshness.
- Serve to Your Dog:
- Once cooled and stored, the homemade yak chews are ready to be enjoyed by your furry friend. Supervise your dog while they chew to ensure safety and monitor for any signs of choking or discomfort.
- These homemade yak chews can provide hours of entertainment and dental benefits for your dog, satisfying their natural urge to chew while promoting healthy teeth and gums.
- Cut and place the shaped chews onto a parchment-lined baking sheet, leaving some space between each one.
Equipment
You will need a few tools for this recipe. You will need:
- Large pot
- Cheesecloth or fine mesh strainer
- Parchment paper or silicone baking mat
- Baking sheet
- Dehydrator (optional)
Substitutions
We tried several different plant based milks, vegan milk, and dairy free milk and none of them worked in this recipe. Make sure you use lactose free milk for this recipe.
In place of the vinegar, you can use lime juice.
Storage
- Room Temperature Storage:
- Once the homemade yak chews are completely cooled, transfer them to an airtight container or zip-top bag.
- Store the chews at room temperature in a cool, dry place away from direct sunlight and moisture.
- Properly stored homemade yak chews can last for several weeks to months at room temperature.
- Refrigeration:
- If you prefer to extend the shelf life of the yak chews, you can store them in the refrigerator.
- Place the cooled chews in an airtight container or zip-top bag and place them in the refrigerator.
- Refrigerated homemade yak chews can last for several months, maintaining their freshness and quality.
- Freezing (Optional):
- For long-term storage, you can freeze the homemade yak chews.
- Place the cooled chews in a single layer on a parchment-lined baking sheet and freeze them until firm.
- Once frozen, transfer the chews to a freezer-safe bag or container, removing as much air as possible before sealing.
- Frozen homemade yak chews can last for up to a year, but be sure to thaw them completely before serving to your dog.
- Monitoring and Inspecting:
- Periodically check the stored yak chews for any signs of mold, spoilage, or changes in texture or odor.
- Discard any chews that show signs of deterioration to ensure the safety of your dog.
FAQ
Lactose-free Himalayan Yak Chews are generally suitable for most dogs, including those with lactose intolerance or sensitivities. However, as with any new treat or dietary change, it's essential to monitor your dog for any adverse reactions and consult with your veterinarian if you have concerns.
Lactose-free Himalayan Yak Chews can be given to dogs as a occasional treat or chew. However, moderation is key, as excessive consumption can lead to digestive issues or weight gain. It's best to follow the manufacturer's recommendations and incorporate them as part of a balanced diet.
While lactose-free Himalayan Yak Chews are generally safe for most dogs, it's essential to supervise your dog while they're chewing to prevent choking or swallowing large chunks. Monitor your dog's chewing habits and remove any small or broken pieces to prevent ingestion.

Lactose Free Himalayan Dog Treats for Dogs
Equipment
- Large pot
- Cheesecloth or fine mesh strainer
- Parchment paper or silicone baking mat
- baking sheet
- Dehydrator (optional)
Ingredients
- 1 gallon lactose free milk
- ½ cup lime juice or white vinegar
- 1 teaspoon salt
Instructions
- Step 1: Curdling the Yak Milk:
- Heat Up: In a large pot, heat the yak milk over medium heat. Keep a watchful eye and stir constantly to prevent scorching on the bottom.
- Bring to a Boil: Once the milk reaches a gentle boil, remove it from the heat.
- Add the Curdling Agent: Now, gently stir in a small amount of lime juice or vinegar, along with some salt, to enhance the flavor.
- Form the Curds: Keep stirring continuously for 1-2 minutes until you see curds separating from the liquid whey.
- Step 2: Straining the Curds:
- Let it Settle: Once the mixture thickens, remove it from the heat and allow it to cool slightly for easier handling.
- Prepare the Strainer: Line a large bowl or pot with a fine mesh strainer or cheesecloth. This will separate the curds (solids) from the whey (liquid).
- Strain the Mixture: Carefully pour the thickened milk mixture through the strainer, letting the whey drain into the bowl or pot below.
- Extract Excess Whey: Use a spoon or spatula to gently press the curds in the strainer, squeezing out any remaining liquid.
- Step 3: Shaping the Chews:
- Form the Dough: Gently fold the curds in the cheesecloth into a rectangular shape.
- Apply Pressure: Place the cheesecloth-wrapped dough between two hard, flat objects (like heavy cutting boards) to press out even more moisture and give the chews their final shape. You can find a video tutorial for this step online for a visual guide.
- Rest and Drain: Leave the pressed dough to rest for 4 hours, allowing any remaining moisture to drain.
- Step 4: Drying the Chews (Choose Your Method):
- Oven Drying:
- Preheat the Oven: Set your oven to a low temperature of 200 degrees Fahrenheit (93 degrees Celsius).
- Arrange the Chews: Carefully cut the shaped dough into individual chew sizes and place them on a parchment-lined baking sheet, ensuring some space between each piece for even drying.
- Low and Slow: Bake the chews for several hours, anywhere from 4-6 hours or longer, depending on their size and thickness. They need to be fully dried and hardened throughout.
- Monitor and Rotate: Check on the chews periodically and rotate the baking sheet if necessary to ensure even drying throughout the process.
- Dehydrator Drying (Alternative):
- Set the Temperature: If you have a dehydrator, set it to 150 degrees Fahrenheit (65 degrees Celsius).
- Dehydrate the Chews: Place the shaped chews on the dehydrator trays and dehydrate for 12-24 hours, or until they reach your desired level of dryness and hardness.
- Step 5: Cool, Store, and Enjoy!
- Cool Completely: Once the chews are fully dried and hardened, remove them from the oven or dehydrator and allow them to cool completely to room temperature.
- Storage: Store your homemade yak chews in an airtight container or zip-top bag at room temperature. They can also be stored in the refrigerator for even longer shelf life.
- Treat Time!: Finally, it's time for your furry friend to enjoy their delicious and healthy homemade yak chews! Supervise your dog while they chew to ensure safety and watch for any signs of choking or discomfort.
Notes
Nutrition
Related
Looking for other recipes like this? Try these:


Leave a Reply